Scouting and Monitoring Techniques
Monitoring fields and scouting for pests is an important part of any pest management plan. As you heard in the video in Module 2, scouting will help you identify pest problems in your field early, know how much of the field or plants may be affected by the pest, and can help guide your decision making process about control and management of the pests. Additionally, regular, annual scouting will provide valuable information about pest trends over time.
When scouting fields you may be looking for a variety of pests including insects, weeds, or plant diseases. The remainder of the information presented here will specifically address scouting for insect pests, though some of the core practices and principles may apply to other pest types as well.
Generally speaking, scouting for insect pests in peony fields should coincide with when insects are actively moving into or around in fields and when they are actively infesting plants. Scouting should continue until the crop has been harvested or the pest presence declines.
Scouting equipment
Before you take the first step on your scouting path, make sure you have a few tools with you. You may find other items that are useful for your scouting needs, but this is a good general list to start with.
- notebook or other means to record information: Recording plant health condition, pests observed, etc. is extraordinarily valuable information when collected over many years.
- magnifying glass/hand lens
- bags, containers, paper for collecting specimens and labeling them
- pocket knife or clippers for collecting samples
- trowel or shovel
- reference material
Scouting patterns
When scouting your field it is important to get a broad sense of what is occurring, but you probably don’t have time to inspect every plant. Choose a scouting pattern that allows you to view different parts of your field and modify it weekly so that you are seeing even more areas of the field each time. Some examples of scouting patterns and scouting plans are below.
|
|
|
|


Individual plant inspections
Scouting may require that you inspect many individual plants in order to make determinations about what is occurring in the field. How many plants you inspect will depend on field size and total number of plants in the ground. You can use this information to help determine if the problem is random or more concentrated within the field which can help narrow down possible causes.
As you are walking along your scouting path, note unusual damage or growth on individual plants. Look at plants and compare healthy plants to damaged or unusual plants. Check the entire plant as well as the surrounding environment (soil, competing vegetation, etc.) and make notes about differences and similarities of the plants. You may inspect as many or as few plants along your route as you decide is best for your field. You may want to choose pre-determined spots along your route to stop at or you might choose to stop randomly along your path. Try a few methods and see what works best for you and what works best in your field. Over time, you may find pest “problem areas” in your field, too.
Insect monitoring with sticky cards
You may decide that you would rather passively monitor for potential pests, or you would like to supplement your active scouting with additional pest monitoring. A great way to passively look for insect pests in peony fields is by using sticky card traps. Sticky cards can tell you when insects are active in the environment and moving around in or potentially moving into your field(s). Yellow and blue sticky cards are most common, though white cards can also be used. A lot of people use blue cards specifically for thrips but yellow is a good “all-purpose” trap for a wide variety of pests.
Two really important things to remember with sticky traps:
- Know what you are looking for and how to look for it when evaluating your cards (for insect pests and identification information refer to Module 2)
- Don’t forget about them. Traps left in the field too long can be difficult to gain useful information from.
Sticky traps should be placed before the pests are active. In Southcentral, placing traps around the end of April or beginning of May will result in the best data. For Interior Alaska, traps should be placed closer to the middle of April for accurate results. The timing of trap placement may fluctuate from year to year based on weather conditions so use your best judgement for your area and your field. If you regularly trap for pests, you will start to see trends in your own fields that can help inform your decisions for future years.
Research done between 2015-2017 showed that placing traps within the peony fields as well as along the border of fields yielded the most comprehensive results about pest pressure and pest movement into and within the field. The diagram below depicts the number and location of traps within a field.
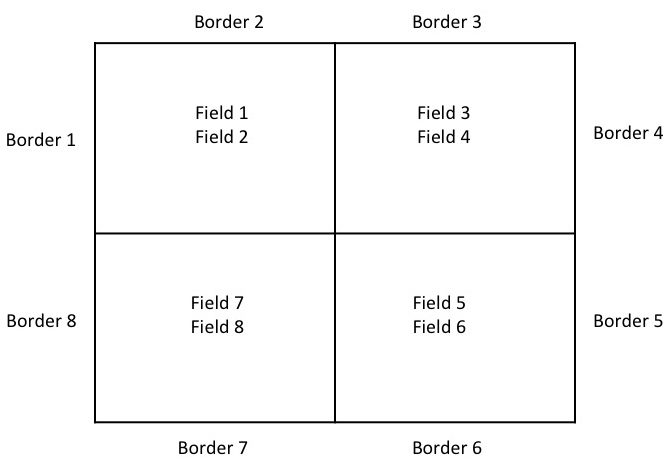
You can adjust the number of traps based on your field size and how much time you have to monitor and check the traps. The suggested trap numbers are suitable for a medium or large field. The most important thing to consider is to have fairly evenly spaced traps and good coverage within the trapping area (i.e. don’t concentrate all your traps on one side of the field).
Traps should be installed on support stakes with an easy mechanism for removing and replacing them throughout the season (clothespins and binder clips work great). Attachment mechanisms should be placed at the height of the crop and moved up the stake through the season as plants grow.

The sticky cards should be checked and replaced at least every other week. If you have had pest problems in the past you may want to consider checking them every week for the best results. Weekly checks will also, usually, be easiest to check because there will be fewer “non-target” insects on them, and thus less “stuff” to check.
Traps can be checked in-field with a hand lens or the cards can be collected and saved for processing later. If you plan to save the cards for future processing you will need to remove them from the posts and place them in a zip top bag or between two layers of cling wrap to keep them from sticking to each other. This method can save in-field time, but may make looking for particular insect pests more difficult as they will have to be viewed through the plastic. Use zip top bags or cling wrap to save cards with suspect pests on them, too. If you find something unusual or that you don’t know the identification of, save the card for future viewing or sending to a pest professional. Do not try to remove an insect from a sticky card; this will likely result in the loss of key identifying characteristics.
Supplies needed for sticky card trapping:
- posts
- means of attachment (clothespins, binder clips, etc.)
- sticky cards
- permanent marker
- sandwich size zip-top bags or plastic cling wrap
- data sheet
Label your sticky cards and keep a datasheet for recording trap catches. Traps should be labeled or numbered in a way that helps you know where in the field the traps were or where pests were found. Use a system that makes sense and works for you, but some suggestions to consider:
- include a map of the field with the trap placement and labels identified
- label each sticky card before it is set out and include the date it was placed with the label
- label your trap posts
A basic data sheet can help make recording your trap catch or other scouting data easy to do and easy to refer to in the future. An example of a datasheet that can help you keep track of your cards and trapping information can be found in the resources section of the course.
Continue to Module 4